Getting Started
Welcome to the Getting Started guide for the Webroot Unity API. This guide will walk you step-by-step through submitting an operation to the Unity API.
Step 1: Acquire Credentials
Please contact your Webroot representative to acquire credentials for accessing the Webroot Unity API. The following information will be required:
- Username is the email address of the user.
- Password is the password of the user.
- Client Id is the unique id assigned to the client application.
- Client Secret is the password for authorizing the client application.
- Scope defines the set of operations an access token is permitted to request. The Webroot Unity API operation used as an example in this guide will require the SkyStatus.Site scope. See Service Extensions and Scopes for further details.
A valid site KeyCode will also be required to submit the Webroot Unity API operation that is used as an example in this Getting Started guide.
Note
The Webroot Unity API has independent environments for Beta and Production. Please ensure the credentials apply to the environment you would like to use.Step 2: Set up REST Client
Set up a REST client to submit requests to the Webroot Unity API. Postman has been chosen to demonstrate the requests in this guide. Other REST clients may also be used.
Step 3: Get Access Token
Description
The Webroot Unity API implements the OAuth 2.0 protocol for user authentication and authorization. In OAuth 2.0 a client requests an access token on behalf of a user. The access token is used for granting access to Unity API operations. See the API Reference for a complete list of the available Unity API operations.
Submit the supplied credentials (as listed in Step 1: Acquire Credentials above) using the following request:
Note
The API URIs listed in the documentation are relative paths. The base URI for this environment is https://unityapi.webrootcloudav.com. Please prepend the base URI to the API URI listed in the documentation to obtain the complete URI. For example, the complete URI for the authenticate request above is https://unityapi.webrootcloudav.com/auth/token.
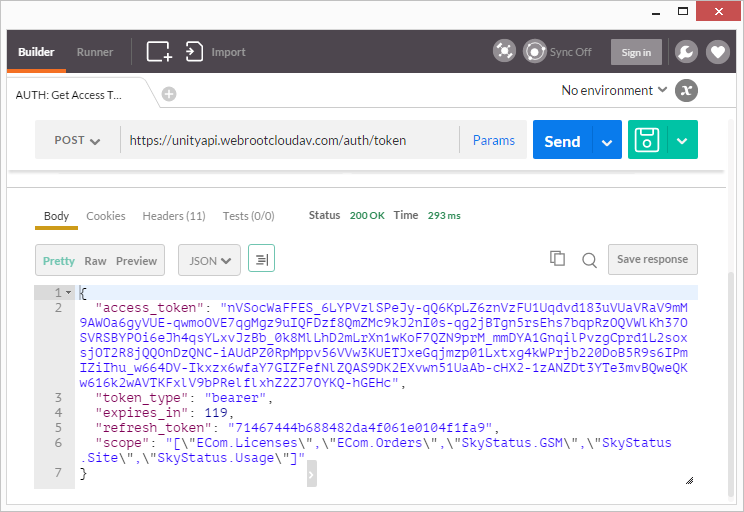
The response of a successful request contains an access token and a matching refresh token. The access token is identified by the access_token field and the refresh token by the refresh_token field.
See Authentication for more information about the authentication process.
Password Flow
The password credentials grant allows users to obtain an access token by providing their username and password directly, enabling applications to access their resources securely.
| Method | API | Description |
|---|---|---|
|
POST
|
Uses user credentials to obtain an access token
|
Using Postman
-
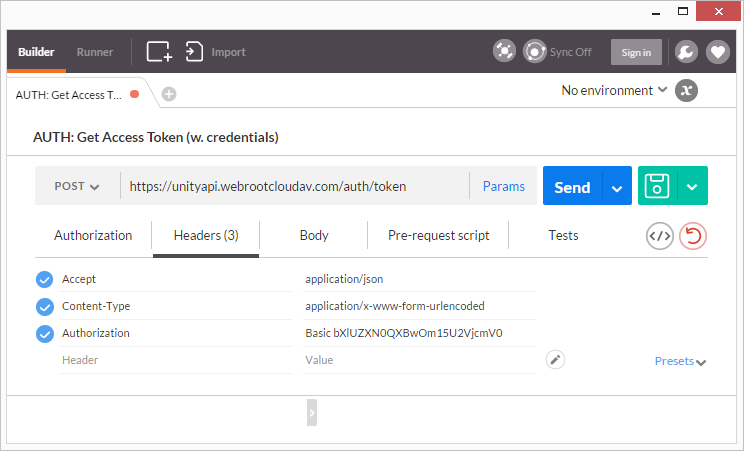
Set the request method to POST and the URL to https://unityapi.webrootcloudav.com/auth/token. Then set the following request headers:
- Set Accept to application/json
- Set Content-Type to application/x-www-form-urlencoded
- Set Authorization to use the HTTP Basic Authentication scheme for the client_id and client_secret. See the Request Description for more details.
-
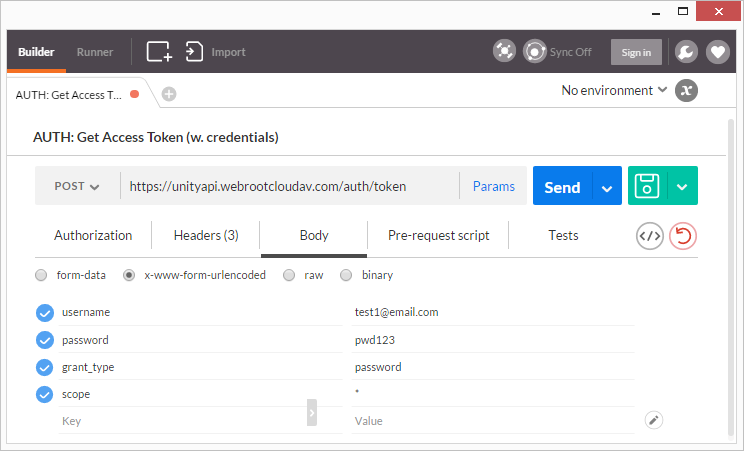
Set the following body parameters and then press the Send button:
- Set username to the email address of the user
- Set password to the password of the user
- Set grant_type to password
- Set scope to SkyStatus.Site or *
-
A successful request responds with an HTTP 200 (Ok) status code and the response body contains an access_token which will be used in the next step.
Authorization code flow
The Authorization Code grant type is used to exchange an authorization code for an access token.
After the user is redirected to the client via the redirect URI, the authorization code is obtained from the URI and used to request an access token.
Note
At present only OpenText Secure Cloud IDP and Webroot IDP are supported. Additional IDPs will be supported in future releases.Using Postman
| Method | API | Description |
|---|---|---|
|
GET
|
Used to initiate the authorization process and obtain authorization code.
|
|
|
POST
|
Uses client credentials to exchange the authorization code for an access token.
|
-
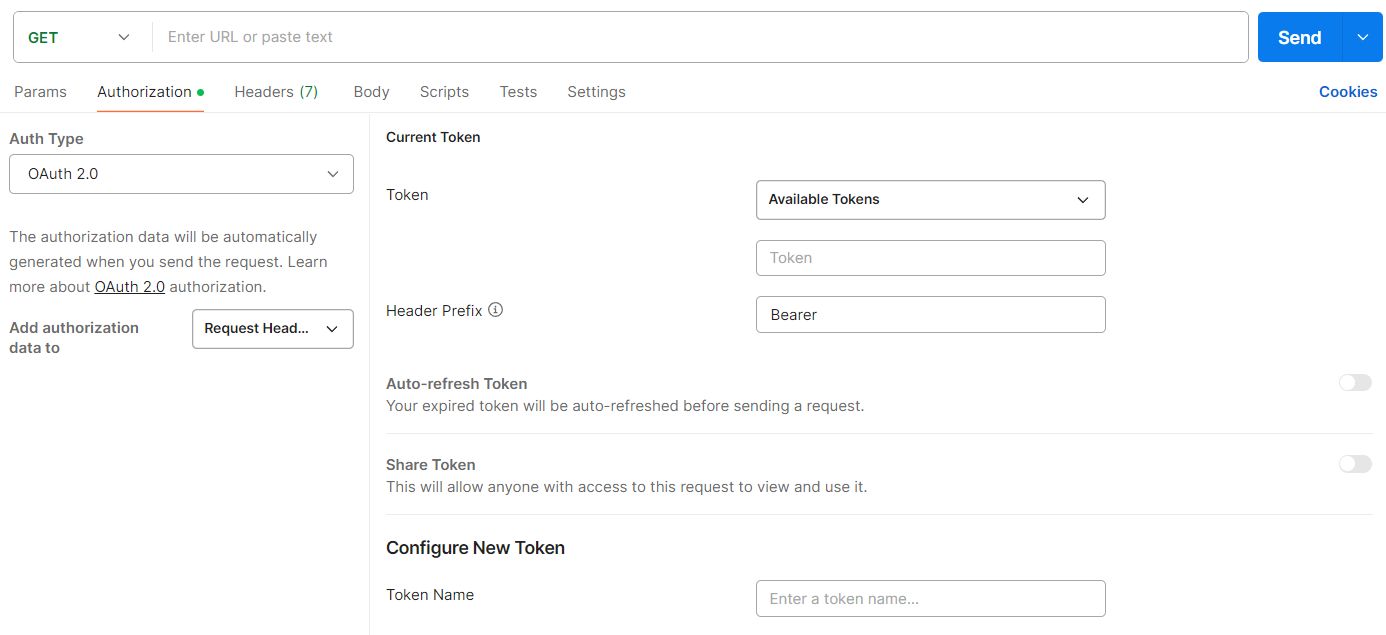
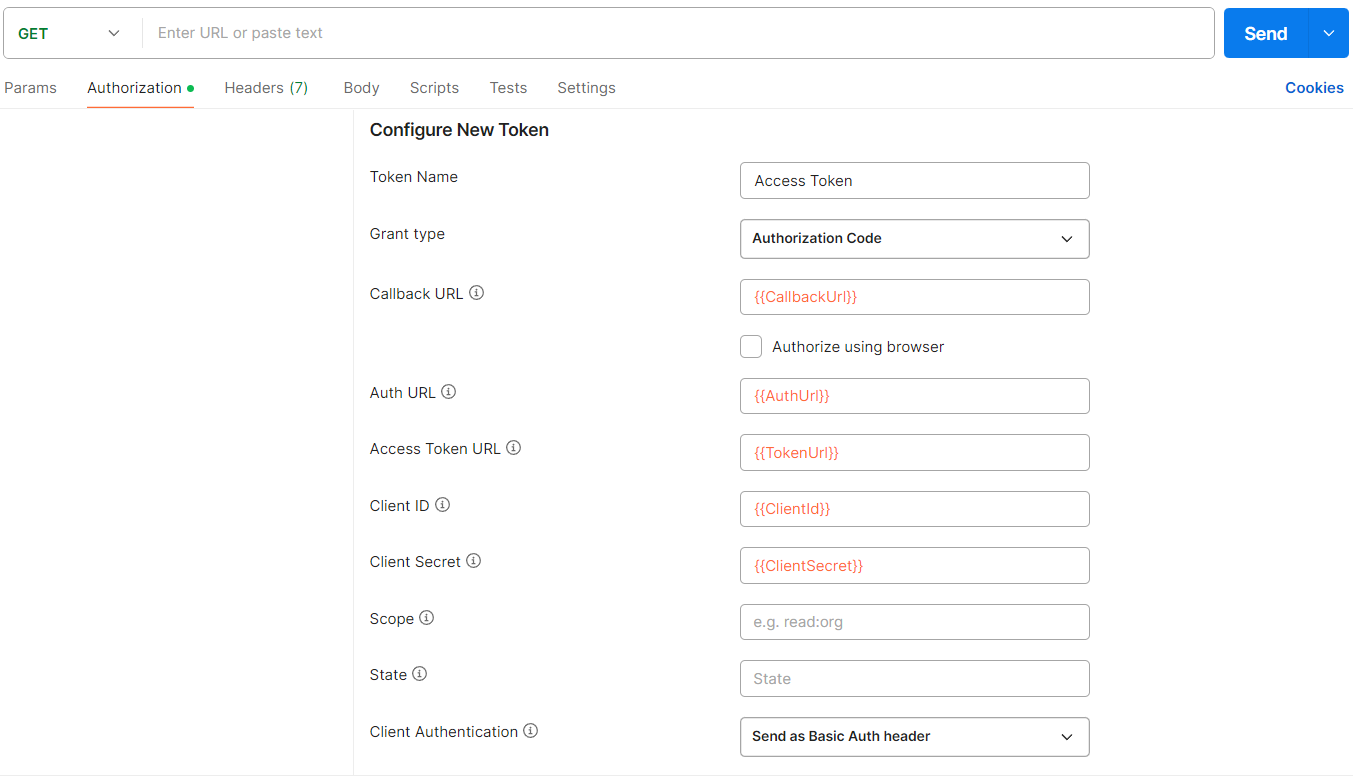
In the Authorization tab for a collection or request, select OAuth 2.0 from the Type dropdown list.
-
Go to Configure New Token and provide below details in the required fields.
- Set Callback URI(redirect URI) to https://oauth.pstmn.io/v1/callback
- Set Auth URI to https://unityapi.webrootcloudav.com/auth/authorize
- Set Access Token URI to https://unityapi.webrootcloudav.com/auth/token
- Set Client ID to Unity provided client id
- Set Client Secret to Unity provided client secret
- Set Scope to SkyStatus.Site
-
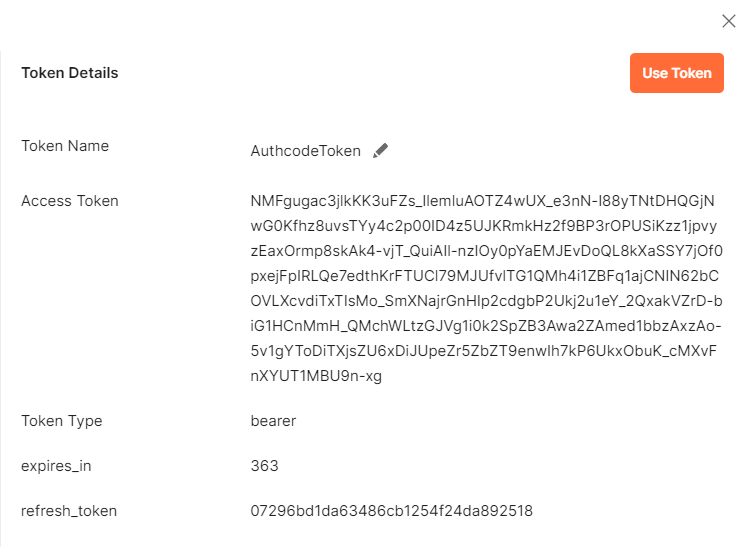
Complete the fields with the required details, then click on Get New Access Token button.
-
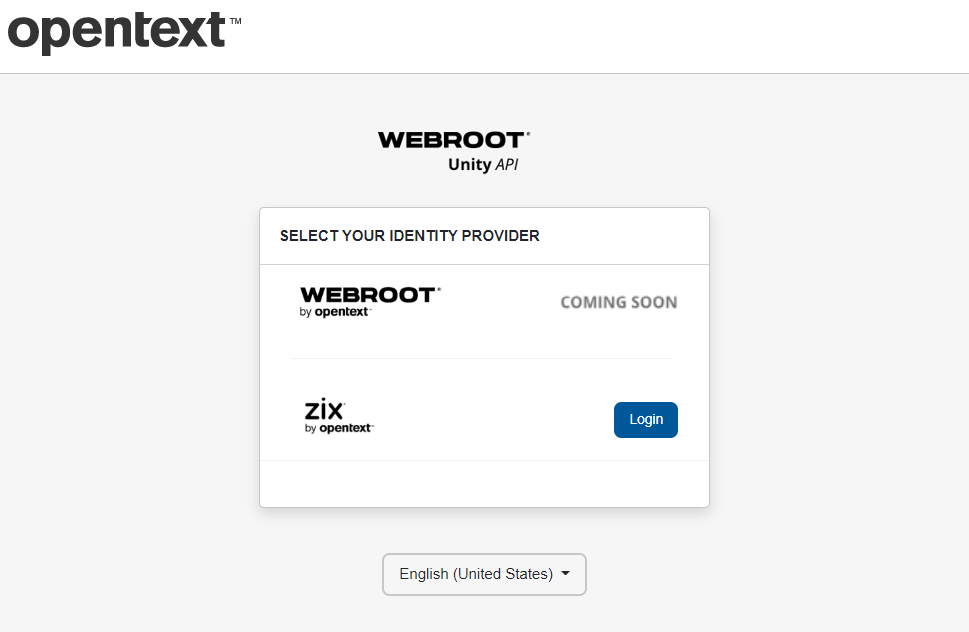
After successful validation of the client, the Unity AuthServer will display a list of available IDPs.
-
Select the desired IDP, then click the Continue button to be redirected to the IDP’s login page.

-
After successfully authenticating with the IDP, the AuthServer will prompt the user to grant the necessary permissions to the client application.
-
If the user grants approval, the AuthServer will redirect the browser to the application's specified redirect_uri. The URI will include a code (authorization code) and a state in the query string, which the application can use to validate whether the request is legitimate and to exchange the authorization code for an access token.
-
A successful request responds with an HTTP 200 (Ok) status code and the response body contains an Access Token which will be used in the next step.
Using a Client Application
| Method | API | Description |
|---|---|---|
|
GET
|
Used to initiate the authorization process and obtain authorization code.
|
-
To begin the authorization flow, the application constructs a URI like the following and opens a browser to that URI.
GET /auth/authorize HTTP/1.1 ?response_type=code &client_id=myTestApp &redirect_uri=https%3A%2F%2Fexample-app.com%2Fcallback &scope=Console.GSM+SkyStatus.Reporting &state=xcoiv98y2kd22vusuye3kch -
Upon visiting this URI and successful client validation, the Unity AuthServer will present a popup showing a list of available IDPs.
-
Select the desired IDP, then click on Continue button to redirect to IDP’s login page.
-
After successfully authenticating with the IDP, the AuthServer will prompt the user to grant the necessary permissions to the client application.
-
If the user grants approval, the AuthServer will redirect the browser to the application's specified redirect_uri. The URI will include a code (authorization code) and a state in the query string.
https://example-app.com/callback
?code=g0ZGZmNjVmOWIjNTk2NTk4ZTYyZGI3
&state=xcoiv98y2kd22vusuye3kch
Exchange the Authorization Code for an Access Token
With the authorization code obtained, the application can now use it to acquire an access token. The application initiates a POST request to the service's token endpoint.
| Method | API | Description |
|---|---|---|
|
POST
|
Uses client credentials to exchange the authorization code for an access token.
|
Request Format (with HTTP Basic Authentication)
/auth/token HTTP/1.1
Authorization: Basic bXlUZXN0QXBwOm15U2VjcmV0
Content-Type: application/x-www-form-urlencoded

code=g0ZGZmNjVmOWIjNTk2NTk4ZTYyZGI3&grant_type=authorization_code
Request Format (with "client_id" and "client_secret" in request body)
/auth/token HTTP/1.1
Content-Type: application/x-www-form-urlencoded

client_id=myTestApp&client_secret=mySecret&code=g0ZGZmNjVmOWIjNTk2NTk4ZTYyZGI3&grant_type=authorization_code
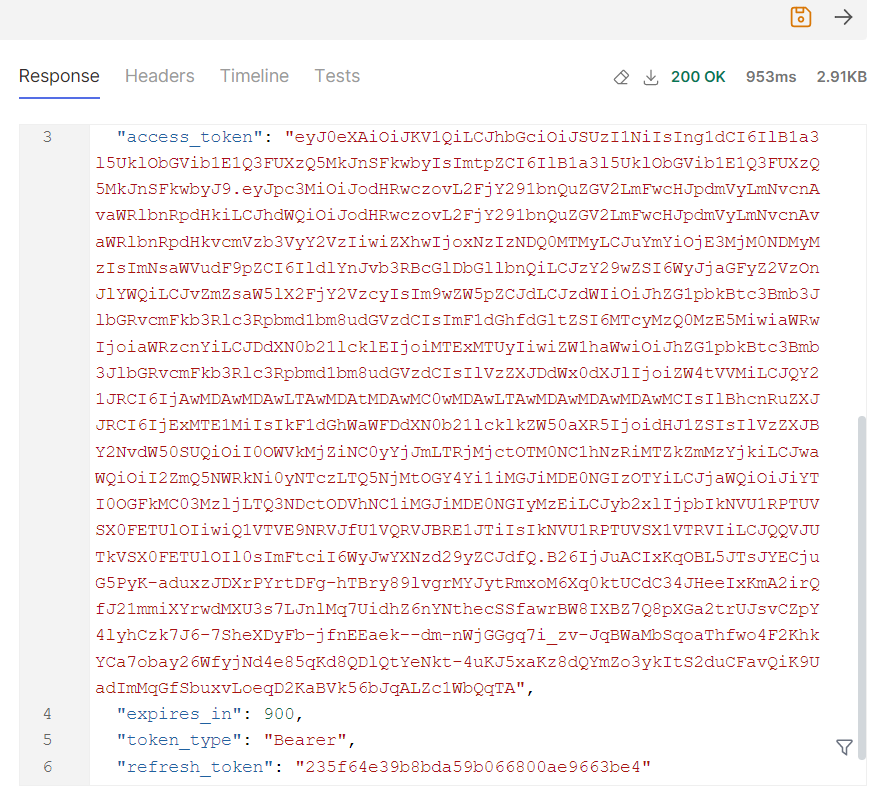
The token endpoint validates all parameters in the request, ensuring the code is not expired and matches the client ID and client secret. If successful, it generates an access token and returns it in the response. With this access token, the application can now make API requests.
Response Format
{
    "access_token": "h9uAtymEyHDKRZex-CAdGGm7ckdv68vcsJtRNikQBKQKahPAVih2UHA0Kh8YxqjcK9WjKo8pQSXLT2KzBkL1yRzmvgzT3I3YOVl9vgHGjnZ3oGY87BJOb5SFYVx
                     PcUU33jPV--crrvi8BuSfBa3SptRhCzF1xDKTayQrTmg-zyliKofR2FvyrBUgS0SYt8RdOnOwcczhA_AaOBUgDCKTbgRTAs8Jnh7seBrbNMN4SWHbsLn1pMOE0bkoYz-mZhc8dqoJ_q
                     85yHmV8hLj00DE1DthL5SD0Ji79yCcLNOVDFdIU8Fm5WeQG-WtbptWrwkNyJDCBuvKtb3Iw2Ss3Qw1N0CQiLre0BgwbyTS0L7bKmd1MZDQ",
    "token_type": "bearer",
    "expires_in": 299,
    "refresh_token": "342187561f1943309d459ae2de05ecef",
    "scope": "[\"Console.GSM\",\"SkyStatus.Reporting\"]"
}
Token Exchange flow
The token exchange grant type supports scenarios where a client can exchange an access token obtained from an upstream client for a new token by interacting with the Webroot Unity API AuthServer.
This allows the client to obtain tokens with different scopes or attributes without needing to re-authenticate the user.
Note
At present only OpenText Secure Cloud IDP and Webroot IDP are supported. Additional IDPs will be supported in future releases.Using Postman
| Method | API | Description |
|---|---|---|
|
POST
|
Uses client credentials and IDP's access token to obtain a new Unity access and refresh token.
|
|
|
POST
|
Uses client credentials and a refresh token to obtain a new access and refresh token.
|
-
In the Authorization tab for a collection or request, select OAuth 2.0 from the Type dropdown list.
-
Go to Configure New Token and provide below details in the required fields.
- Set Callback URI(redirect URL) to IDP callback URI
- Set Auth URI to IDP authorizePath
- Set Access Token URI to IDP Access Token URI
- Set Client ID to IDP client id
- Set Client Secret to IDP client secret
- Set Scope to IDP scopes
-
Complete the fields with the required details, then click on the Get New Access Token button.
-
After clicking the Get New Access Token button, the user will be redirected to the IDP’s login page.
-
After successfully authenticating with the IDP, the client page will prompt the user to grant the necessary permissions.
-
If the user is validated successfully, a new access token will be generated from the IDP.
-
A successful request responds with an HTTP 200 (Ok) status code and the response body contains an Access Token which will be used in the next step.
-
Copy the provided access token and send it to Webroot Unity API token request endpoint to exchange with Unity access token using token exchange flow.
Exchange the Subject Token for Unity Access Token and Refresh Token
With the Subject Token obtained, the application can now use it to acquire an unity access token and refresh token. The application initiates a POST request to the token endpoint.
| Method | API | Description |
|---|---|---|
|
POST
|
Uses client credentials and IDP's access token to obtain a new Unity access and refresh token.
|
Request Format (with "client_id" and "client_secret" in request body)
/auth/token HTTP/1.1
Content-Type: application/x-www-form-urlencoded

client_id=myTestApp&client_secret=mySecret&grant_type=token_exchange&subject_token=eyJ0eXAiOiJKV1QiLCJhbGciOiJSUzI1NiIsIng1dCI6IlB1a3l5UklObGVib1E1Q3FUXzQ5MkJnSFkwbyIsImtpZCI6IlB1a3l5UklObGVib1E1Q3FUXzQ5MkJnSFkwbyJ9.
eyJpc3MiOiJodHRwczovL2FjY291bnQuZGV2LmFwcHJpdmVyLmNvcnAvaWRlbnRpdHkiLCJhdWQiOiJodHRwczovL2FjY291bnQuZGV2LmFwcHJpdmVyLmNvcnAvaWRlbnRpdHkvcmVzb3VyY2VzIiwiZXhwIjoxNzI0NzM5MzY4LCJuYmYiOjE3MjQ3Mzg0NjgsImNsaWVudF9pZCI6IkFwcFJpdm
VyTmdpbnhVSUNsaWVudCIsInNjb3BlIjpbImVtYWlsIiwib3BlbmlkIiwiQm9zdW5DbGFpbXMiLCJvZmZsaW5lX2FjY2VzcyJdLCJzdWIiOiJhZG1pbkBtc3Bmb3JlbGRvcmFkb3Rlc3Rpbmd1bm8udGVzdCIsImF1dGhfdGltZSI6MTcyNDM5NDQwNCwiaWRwIjoiaWRzcnYiLCJDdXN0b21lcklEI
joiMTExMTUyIiwiZW1haWwiOiJhZG1pbkBtc3Bmb3JlbGRvcmFkb3Rlc3Rpbmd1bm8udGVzdCIsIlVzZXJDdWx0dXJlIjoiZW4tVVMiLCJQY21JRCI6IjAwMDAwMDAwLTAwMDAtMDAwMC0wMDAwLTAwMDAwMDAwMDAwMCIsIlBhcnRuZXJJRCI6IjExMTE1MiIsIkF1dGhWaWFDdXN0b21lcklkZW50
aXR5IjoidHJ1ZSIsIlVzZXJBY2NvdW50SUQiOiI0OWVkMjZiNC0yYjJmLTRjMjctOTM0NC1hNzRiMTZkZmMzYjkiLCJwaWQiOiI2ZmQ5NWRkNi0yNTczLTQ5NjMtOGY4Yi1iMGJiMDE0NGIzOTYiLCJjaWQiOiJiYTI0OGFkMC03MzljLTQ3NDctODVhNC1iMGJiMDE0NGIyMzEiLCJyb2xlIjpbIkN
VU1RPTUVSX0FETUlOIiwiQ1VTVE9NRVJfU1VQRVJBRE1JTiIsIkNVU1RPTUVSX1VTRVIiLCJQQVJUTkVSX0FETUlOIl0sImFtciI6WyJwYXNzd29yZCJdfQ.HQ7diss4FFulpbki-rry5Nneczihh1CpDNlBhgo7uRNjylV73xN7hjyO6zuMf7g7Od9YlgMmPJT2JBfae3MdpbYFpyWXcCIHocVRGe7
HW_aNCR0PddI50bXqpfVfv4uZpk6561mg9JU5cf4ST0Ary3jr87WqTNhdLTe0jqJyM46hQjsPVyGHrfKojvCPEJ5zRyk6JG3dxtgdOpk_0ivMV8HEch4goECwjkJHukk-g8wBjcqPQxQScBy1yLFR0eH23pDckR08YbTpkuDBuRXz7A6GOkPROF9tz7EVykXOjGktMKo8poDAtR6nhNmxlMi6BuYMi7ftl5r5SOOe49JI1w
&scope=SecureCloud.Usage&subject_token_type=jwt
The token endpoint validates all parameters in the request, ensuring the subject token has not expired and matches the client ID and client secret. If successful, it generates an access token, refresh token and returns them in the response. With this access token, the application can now make API requests.
Response Format
{
    "access_token": "-GOzYxdoL1M71taifS6vdMJBKGzipcOiKXSzK224UecsC96A_3G4QsmCRYWcagegS6EQ991ZocTFRdX2ziwbwmpQXfBv5NxLPGWDeb8ywJ-SpqJKEFeheOOXWRgs1AtTzxKSpfRVkY16FjK7bp72ij6YJJFdt-ktthFsy-zo-LTZTy3MikwFHihc8WXpgSOZBsoB-q5h2bqmXPXFA_DR9vMJTyAmiq8dhBanN_4gG1MbqAB0Ev4TyqgHkxjf2ED7PDiSpdyq2fuIEXjB4WwYayojYMjycI8OlftgC4D6-GfqmwdK_KoiihPdL9ZrhgeqRh-uKTEx96DwQoiTeVjR0xRHgCUzn_buayBKA_Cbsj1-vCgG6uwCeTbbfAqJuVCZ-2TcHw",
    "token_type": "bearer",
    "expires_in": 1843,
    "refresh_token": "8197863146a44317a1daa5ad0ac843f4",
    "scope": "[\"SecureCloud.Usage\"]"
}
Step 4: Submit Webroot Unity API Operation
Description
After an access token has been obtained, make authorized requests to the Webroot Unity API by adding an Authorization header to each request as follows:
Authorization: Bearer {access token}
For the following sample operation submit the site KeyCode using the request below:
| Method | API | Description |
|---|---|---|
|
GET
|
Returns agent status information for all endpoints matching the specified criteria.
|
Using Postman
-
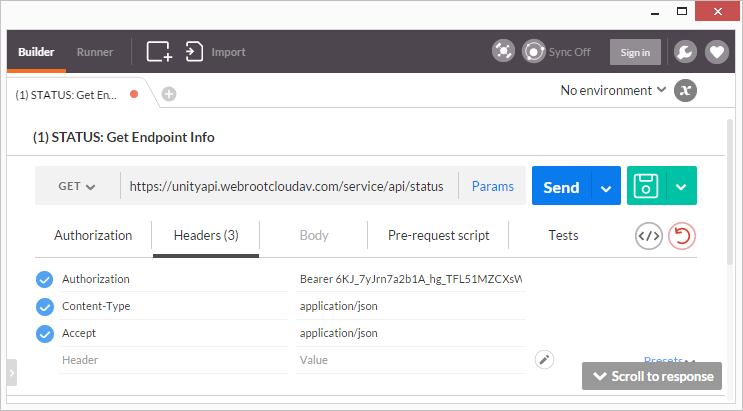
Set the request method to GET and the URI to https://unityapi.webrootcloudav.com/service/api/status/site/{keyCode}. Then set the following request headers:
- Set Accept to application/json
- Set Content-Type to application/json
- Set Authorization to Bearer {access token}
-
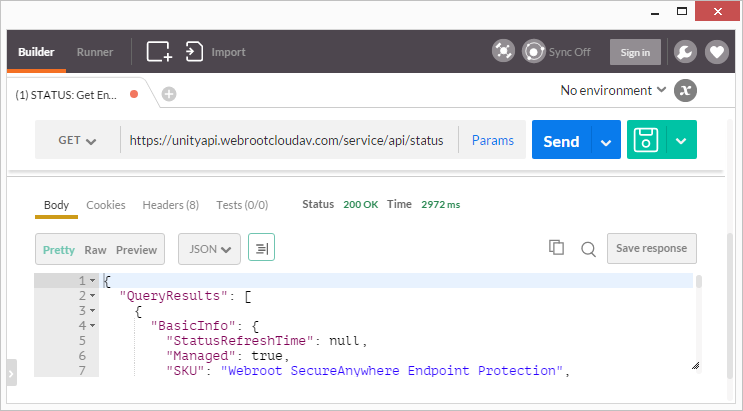
A successful request responds with an HTTP 200 (Ok) status code and the response body contains a JSON structure with the agent status information.
Troubleshooting
If the submitted access token has expired, the server responds with an HTTP 401 (Unauthorized) status code and the message "Error": "invalid_token". In this case a new access token needs to be obtained as described in Step 5: Refresh Access Token below.
If the submitted access token does not contain the scope required for the requested Webroot Unity API operation, the server responds with an HTTP 403 (Forbidden) status code and the message "Error": "insufficient_scope". In this case choose one of the following steps:
- If the user has appropriate access rights for the scope required, obtain a new access token as described in Step 5: Refresh Access Token below. Ensure the required scope is specified in the scope URI parameter.
- If the user does not have appropriate access rights for the required scope, please contact your Webroot representative to grant the access rights for the required scope.
Step 5: Refresh Access Token
Description
A new access token can be requested if the current access token is invalid or has expired. The recommended approach is to use the refresh token returned in the response of Step 3: Get Access Token above as it does not require any user credentials. Submit the refresh token using the following request:
| Method | API | Description |
|---|---|---|
|
POST
|
Uses a refresh token to obtain an access token
|
The response of a successful request contains a new access token and matching refresh token.
Using Postman
-
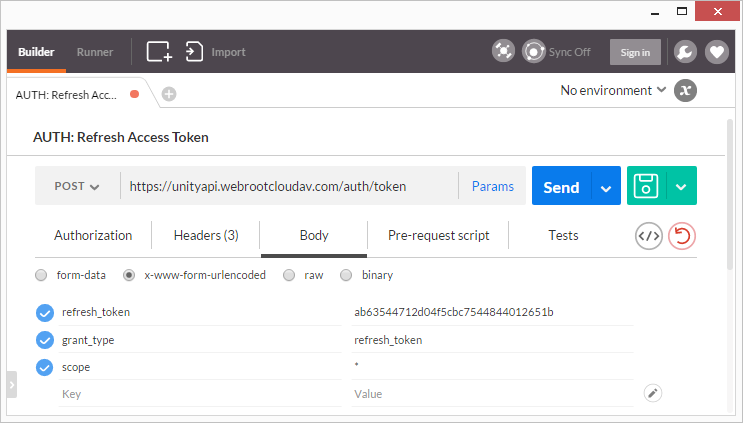
Set the request method to POST and the URI to https://unityapi.webrootcloudav.com/auth/token. Then set the following request headers:
- Set Accept to application/json
- Set Content-Type to application/x-www-form-urlencoded
- Set Authorization to use the HTTP Basic Authentication scheme for the client_id and client_secret. See the Request Description for more details.
-
Set the following body parameters and then press the Send button:
- Set refresh_token to {refresh token}
- Set grant_type to refresh_token
- Set scope to SkyStatus.Site or *
-
A successful request responds with an HTTP 200 (Ok) status code. The response body contains an access_token which can be used to continue carrying out Webroot Unity API operations as in Step 4: Submit Webroot Unity API Operation. The response body also contains a new refresh_token so that this step can be repeated in the future.

Troubleshooting
If the submitted refresh token has expired or has become invalid, the server responds with a HTTP 400 (Bad Request) status code and the message "Error": "invalid_grant". In this case a new access and refresh token pair must be requested as described in Step 3: Get Access Token above.